
I recently participated in a masterclass with Wampler Artist Andy Wood and was rather unexpectedly thrust into the limelight to talk about the finer points of guitar pedals. I was anticipating a huge amount of technical questions that I would need to call Brian about, people asking me which clipping diodes were used in a certain circuit, what amps liked which pedals, which fuzz pedal played nicely with a 1967 throb-o-matic deluxe univibe, that sort of thing, but I was wrong. A lot of folk just wanted a fundamental understanding of how to build a reliable and usable pedalboard from the ground up and they wanted to know how to achieve something close to Andy’s tone on a modest budget.
That was my lightbulb moment – I figured I would write a couple of blogs and try and distill some knowledge about building an awesome pedalboard for anyone who might be attempting to put a new board together for the new year. Whether it’s your first pedalboard or your 100th iteration (ahem – guilty) you might find some nuggets of wisdom below – so let’s dive in! I should hasten to add that – other than Wampler pedals – I have no association with any of the companies mentioned here. This blog is drawn from my personal experience and the gathered wisdom of others.
Pedalboards
Firstly the pedalboard itself. This in essence needs to be nothing more than a flat surface of a suitable size. Some folk like wood, some metal, some multi-tiered, some flat. There is no single “best” pedalboard that suits everyone but there are a number of great solutions I’ve seen over the years. If you have an old deck and want a pedalboard, that can be a great platform. And you can put wheels on it and pop a sick ollie after your gig. The IKEA “Gorm” shelf was another popular product, with its railed design allowing for neat tucking away of cables etc., and these have now been superseded by the Hejne. These make a nice starter board, are a good size, and because they are bare wood you can personalise the finish with whatever color you so desire. I’m a fan of Pedaltrain pedal boards – I currently have 3 all within stomping distance. They use rails, so are very flexible in terms of configuration, they’re hard-wearing and finished in classic powder coat black, and they come with a useful carry case.


There are of course a bunch of great manufacturers making similar quality alternatives, too many to mention here, and there are innovations aplenty – the D’Addario Xpand extendable boards recently hit my radar. The Rolls Royce of pedalboards is probably found among the Schmidt Array custom pedalboard range. These are works of art, no two ways about it, but that artistry certainly comes with a handsome price tag. Pictured to the left (or above if you are browsing on mobile) is Lee Harris from Nick Mason’s Saucerful of Secrets’ awesome Schmidt Array based pedalboard, and some of his rather tasty amps too.
Attaching pedals
Now you’ve found your platform, how are you going to attach your pedals? This is a subject of much debate. The most common adhesive system is good old fashion “Hook and Loop” fasteners, the most famous brand being VELCRO® Brand fasteners. This is a great solution and many boards come with generous rolls of said material but there are a few issues to consider.

Hook and loop fasteners are not particularly strong unless you use quite a lot, and they tend to be prone to losing power when contaminated with fluff and hair type fibres. It is not unheard of to see people cover the entirety of the back of a pedal to ensure a good stick. This is overkill for most pedal and board types. Moving up from hook and loop, we come to plastic reclosable fasteners, like 3M Dual Lock. This is essentially the same principle as hook and loop except it is formed from rigid plastic and is “single sided” – rather than having 2 sides, a hook side (scratchy) and a loop side (furry), the plastic “bobbles” are designed to lock together so you don’t have two separate tape reels to keep hanging around. It is also significantly stronger which means you need a heck of a lot less. I prefer to take ½ inch long strips or pre-cut “dots” and put them on each corner – this is more than enough to make a great and stable mounting. Another tip – some fasteners can leave some adhesive residue behind on your pedal. The best solution is to put some painter’s masking tape over the base of the pedal and stick your chosen fastener over it. I should also mention that if you use too much of either fastener, you may find taking the pedals off your board a challenge, and some sort of plastic pry-bar might be needed. The little plastic levers they sell for changing pushbike tyres work well for this. Has your pedal got little rubber feet on them? If so, remove them before applying your fastener of choice. For bonus points, you can keep the old rubber feet in that box of cables that you never use. Perhaps it’s a BOSS or similar pedal with a giant rubber footplate? I find that 3M Dual Lock can be mounted in the gap in the middle of these and works great – you may want to add some masking tape to preserve the finish as above. This is one of the reasons that here at Wampler pedals we don’t attach the feet but rather we give them to you as a self adhesive option.
There are also a number of other ingenious attachment options. Some pedalboards come with mounting brackets and screws, you can also buy bespoke solutions, like the well engineered “StompTrap” brackets that offer a quick release solution for your board. Some folk like to use cable ties. I’ve heard of strange fasteners with weird chains and quick release thumbscrews. It is very much down to personal preference, for me a Dual Lock style plastic fastener is the most flexible solution – allowing a secure board fixing and the ease of quick repositioning.

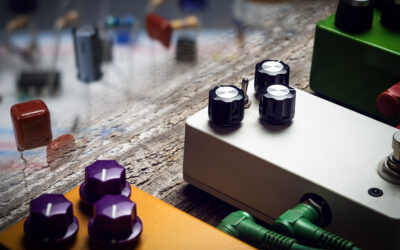
Patch Cables
Now to the most divisive of subjects in this blog – what sort of cable should you use to connect your pedals together? There isn’t a “one size fits all” option here but there are some great cables on the market. Firstly I would recommend “dry building” your board and working out what size of connectors you will need. Patch cables are available most commonly in Mono (Tip and Sleeve) but sometimes also in Stereo (Tip Ring Sleeve) and a myriad of shapes, sizes, and colors – typically you will be using Mono cables. The most important thing when creating a neat pedalboard is the size of the connector head – this can make all the difference in terms of how many pedals you will be able to get on your board and how much space you will need. This is even more important for pedals that have their inputs and outputs mounted on the sides like our range of mini pedals.
You can spend as much or as little as you like on cables, and generally you get what you pay for. The D’Addario patch cables are probably my go-to “budget” cables as I’ve never had one break on me. My personal favorites are the EBS range, and specifically the EBS Gold flat cables. The head on the connector is probably the smallest out there and it allows for very neat hookups between pedals. The cable is flat so you can tuck it away with ease. I should also mention “solid” connectors here, which look like a double ended jack plug, generally used to connect smaller pedals or those with side mounted jack sockets. I am not a huge fan of these, because I feel the flexibility of a cable is a useful safety feature, but if they are used correctly there isn’t an inherent issue. It does mean you have to be super careful when moving any pedal with one in. The saving in space is not worth that extra bit of hassle, and there are numerous apocryphal horror stories of people destroying pedals with them under certain conditions.
If you want to go one step further you may want to make your own patch cables. This can be very rewarding and help you achieve a tidy finish to the surface of your board whilst also allowing custom cable lengths to be catered for. This is where the controversy comes in – if you go DIY do you make soldered or solderless cables? Brian is not a fan of solderless cables – and certainly he makes a good point. Many brands, especially at the value friendly end of the scale, are perhaps merely disasters waiting to happen. You cannot beat a good quality soldered cable for durability. One exception to this rule is the Evidence Audio SiS (Screw in Solderless) cables. I have been running these on my board for about 4 years and not one of them has ever failed me. They are incredibly high quality, easy to build, and the connector heads have a tiny footprint. An essential bit of kit for anyone thinking about making their own cables is an inexpensive cable tester – I favor the Behringer CT100 – it eliminates all uncertainty from your build and speeds DIY cable building up immensely.
Powering your pedals
We’ve got our board, we’ve figured out how we are gonna stick our pedals down, we’ve figured out how we are going to connect them together, now we must also consider how we are supplying power. Some pedals will accept a 9V battery, some will not. Most modern pedals use the universal “BOSS Style” PSA, a center negative 9V connector standard, and there are a number of power supplies that can supply this. If you are running a decent number of pedals you should aim to get one with multiple isolated outputs. This is the least noisy option across the board and gives you the most flexibility for your pedals. You’ll need one with suitable output current – some pedals draw 100X more current than others so you need to be aware of what your requirements are. Again this is where dry planning, using a planning tool, or if you are sad like me, a spreadsheet, can really help. You should add up the current requirements then buy a supply that supplies something like 50% more current than you require if you plan on expansion. Which trust me, you do.
You can also daisy-chain certain pedals together by using a power supply with multiple connectors connected to the same output. This is not suggested for beginners as you need to have an understanding of which pedal circuits are happy to be daisy-chained without adding in additional noise and which are not and this is not a simple subject. Both Brian and I are fans of the TrueTone power supplies – I use the CS12 on my board and it powers up 15 pedals and 2 switchers without missing a beat. Their single output “Wall wart” is a great bit of kit too – it outputs 1700ma and is a great solution for daisy chaining certain pedals together – adapters to add 3,5,7 additional output plugs are available.
A question we get asked sometimes is “How come my pedal is still powered up when I unplug my power supply?” and the answer is often less magical than you may think. It probably still has a battery inside it, so that raises a good point – if you are powering your pedals with a power supply you should disconnect the battery to avoid any chance of leakage.
Keeping it neat
You will most likely run your power cables underneath your board and you will want to tidy them. You can use cable ties and the little self adhesive mounting posts to go even further. Some people have ridiculously neat board undersides and those people are maniacs. Joking, but I have never had the patience to do that. I would also say this – if you move your board around a lot, think carefully about how you tie down all your power!
Well that just about covers the basics – in the next blog I will be looking at Tuners, Switchers, and the first pedals I would buy for my board with three different budgets, so until then, rock on my friends!


Hello, I have MXR pedals that are battery powered as well as plug in. What is the best way to power/configure a pedalboard?
Thank you
I like the true tone Cs6 and cs12 power supplies – they aren’t the cheapest but they are very practical and well built – and can power a whole board’s worth of pedals
A plastic putty knife is the best and easiest way to break the hook-and-loop connection. You slide it between the two; no need to pry.
In a pinch, a credit card will work the same way.
I tried this and it breaks the dual lock plastic nibs some on both sides, necessitating replacement!
What broke the nibs ?
In the realm of innovative materials, elastic rubber tape has emerged as a versatile and practical solution with a wide range of applications. This specialized tape, made from elastic rubber compounds, offers unique properties that make it indispensable in various industries. In this article, we delve into the characteristics, uses, and benefits of elastic rubber tape, showcasing its contribution to modern manufacturing and everyday functionality.
Seriously great info here! Never heard about the painters tape trick, will be using it from now on.
Thank you British King of Fuzz!
I’ve been using this pedal boards brand called Guitto which I have 3 other pedal boards offerings GPB 01, GPB 02, and GPB 03. It basically locks the pedals on to the board, been using it for the past couple of years, no vecro, works well when you locked into a pedal config, I also 3d printed out some brackets to have a two tier board with larger board below and smaller board on top. https://en.guittochina.com/Details/972134655867879424.html
Jain Narrow Fabrics elastic rubber tape is truly a game-changer! The quality and elasticity of this tape are unmatched, making it an essential in my sewing and crafting projects. It provides a secure and flexible hold, making it perfect for various applications. The durability and resilience of the elastic rubber tape from Jain Narrow Fabrics have made it my go-to choice for a wide range of projects. Kudos to Jain Narrow Fabrics for delivering a product that combines reliability and performance.
Jain Narrow Fabrics, the go-to elastic manufacturer in Ahmedabad! With their top-notch quality and wide range of elastic products, they’ve earned their reputation as a trusted supplier in the industry. From durability to flexibility, they’ve got you covered. Highly recommended for all your elastic needs.
Jain Narrow Fabrics, the leading elastic manufacturer in Surat, sets the standard for quality and innovation in the industry. With their commitment to excellence and a diverse range of elastic solutions, they cater to the needs of various sectors, ensuring durability, flexibility, and style in every product. Trust Jain Narrow Fabrics for all your elastic needs and experience unmatched craftsmanship and reliability.
Jain Narrow Fabrics, the leading elastic manufacturer in Surat, sets the standard for quality and innovation in the industry. With their commitment to excellence and a diverse range of elastic solutions, they cater to the needs of various sectors, ensuring durability, flexibility, and style in every product. Trust Jain Narrow Fabrics for all your elastic needs and experience unmatched craftsmanship and reliability .
Regardless of preference of materials to secure your pedals to the board, the key word being secure, and safety.
After all your equipment goes through enough from gig to gig. The last thing you want is opening your case only to find helter-skelter, instead of plug and play, you have to frantically reset with faith your boxes will perform in a live environment. Good patch and power supply is mandatory. I currently have 8 large pedal boards. A floor processor and several rack mount effects that I run in loop. My 8 sepetate boards are exactly just that, I utilize mostly just one, maybe 2 depending on the situation. I have every pedal known to fiddle picking with top end pedals worth several hundred to thousands, including vintage. A nd pedals that I spent no more than $15-$30 for. Bottom line, they are all just stomp boxes. And at the end of the day, the hype and marketing hysteria has created a monster. No matter how cool the graphics are. Now, I’m not completely insane as I realize some of the electronics are exceptional if not stand alone masterpieces.
But so many are over priced if not completely disappointing. The One Rule I have is, That a pedal must be Quiet. I don’t care what it does, if they be noisy, then it’s just a paper weight and will have no place on my board(s).
The elastic manufacturing industry in Ahmedabad serves as a significant contributor to the local economy, generating employment opportunities and fostering economic growth. With a skilled workforce and robust infrastructure, Ahmedabad has emerged as a preferred destination for elastic manufacturing, attracting investments and driving industrial development in the region. Additionally, elastic manufacturers in Ahmedabad play a vital role in supporting ancillary industries and supply chains, further bolstering the city’s economic landscape.
The masking tape trick is a good idea. But how long does that last in reality? I’d be concerned that the pedal could come away from the masking tape (unless I’m missing some extra strong masking tape on sale somewhere…!)
Great tips – I hadn’t heard of either the 3M Dual Lock or the painter’s tape ideas before. I am an airbrush painter, so have a box full of various adhesion tapes – this is brilliant! Many thanks for the great article.
I was actually looking for an article on “how to avoid pedalboard bloat” – I tend to just keep buying pedals and then hit a wall of frustration, sell it all off, and start over. It’s like an insanity loop! lol …
Pedaltrain Nano pedalboards fit Ernie Ball Power Supplies that can be velcro mounted underneath. There is not nearly enough discussion about power supplies. In my experience with the Wampler pedals I Own, themini and full size Ego Compressor, mini Tumnus and Wampler Belle, I never needed to use a power supply. The noise shielding in Wampler pedals is amazing. Best quality mini pedals there are to buy came to me from Wampler in my opinion