
In case it escaped your attention, we released Brian’s take on the infamous rodentine 80’s distortion circuit last month – a pedal that has been requested numerous hundreds of times. I’m happy to say it’s been a big success so far, we almost couldn’t shovel the coal on the furnace fast enough to keep ’em in stock during launch if you don’t mind my metaphor. The journey to launch was, as ever, an interesting one…and once the oh-so predictable leak occurred ahead of schedule the forums lit up with predictions about the pedal.
The first prediction was that it was going to be a complete clone and therefore what was the point. I think we pretty much destroyed that notion with the first demo when the voice switch was toggled, but in case you need reminding, have a look at Pete Thorn’s excellent video. This has got the heart of the circuit it pays loving tribute to for sure but it also has extra capabilities that make it truly unique, and in my humble opinion, one of Brian’s cleverest designs. Possibly my favourite ever mini pedal drive…ever. Ok, certainly in my top 5. It has a range of solid tones from a grunty little boost to a full on screaming saturated fuzz – in fact it makes one hell of a replacement for traditional fuzz pedals at its most extreme.
The next random internet prediction was that we were going to use some form of surface mounted Op-amp chip (in layperson’s terms, the bit that does all the work) because surface mounted is worse and we wouldn’t spend the money on a vintage Op-Amp like the fabled LM308. Well that’s just dumb. Of course we would be surface mounting some of the components as normal – many through-hole components have become obsolete and anybody manufacturing at volume will therefore need to use SMT – but we also knew this circuit needed to cater to those who wanted that original sound completely. So we had our Op-amp (a TL071 in case you were wondering) socketed in case anyone wanted to try something vintage in it.
As a number of videos (like this one here) demonstrate, the op amp isn’t really the magic sauce that everyone might think for this circuit. But also these things can be subjective and if you think you prefer the LM308 over our choice then we have provided a handy socket to replace the op amp. To do this, you need to disassemble the pedal completely. I am in no way encouraging you to do this – but if you do want to modify your own pedal here’s some help for first timers…
First you need to remove some of the hardware from the top as the socket is mounted on the top of the circuit board and you will need to remove the whole circuit board to do this. Remove the metal knobs by using a small hex driver to loosen the Allen screws (2 per knob) on each knob, and gently lift the knobs off the pots and put them to one side. Remove the nuts that hold the two toggle switches and the footswitch and also put to one side. Flip the case over, remove the four screws that hold the baseplate to the top of the enclosure. You should now be able to remove the entire circuit / hardware by gently lifting it out of the enclosure…
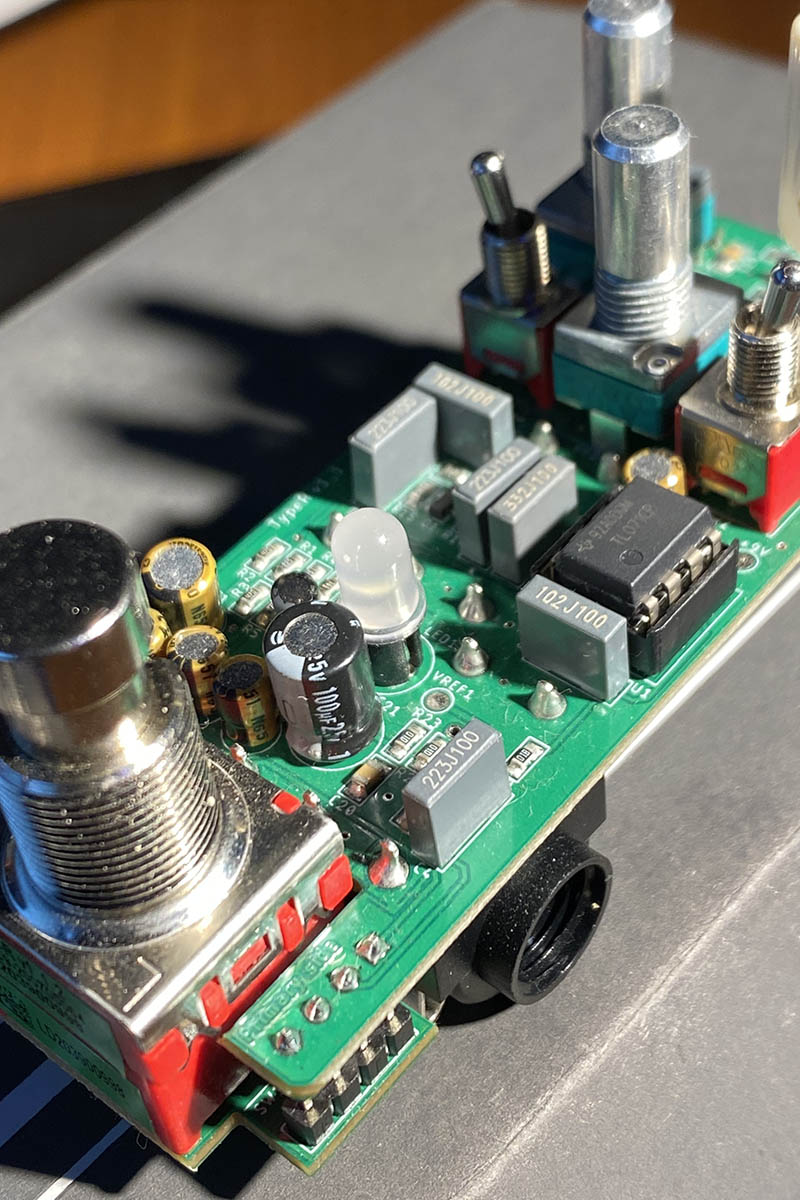
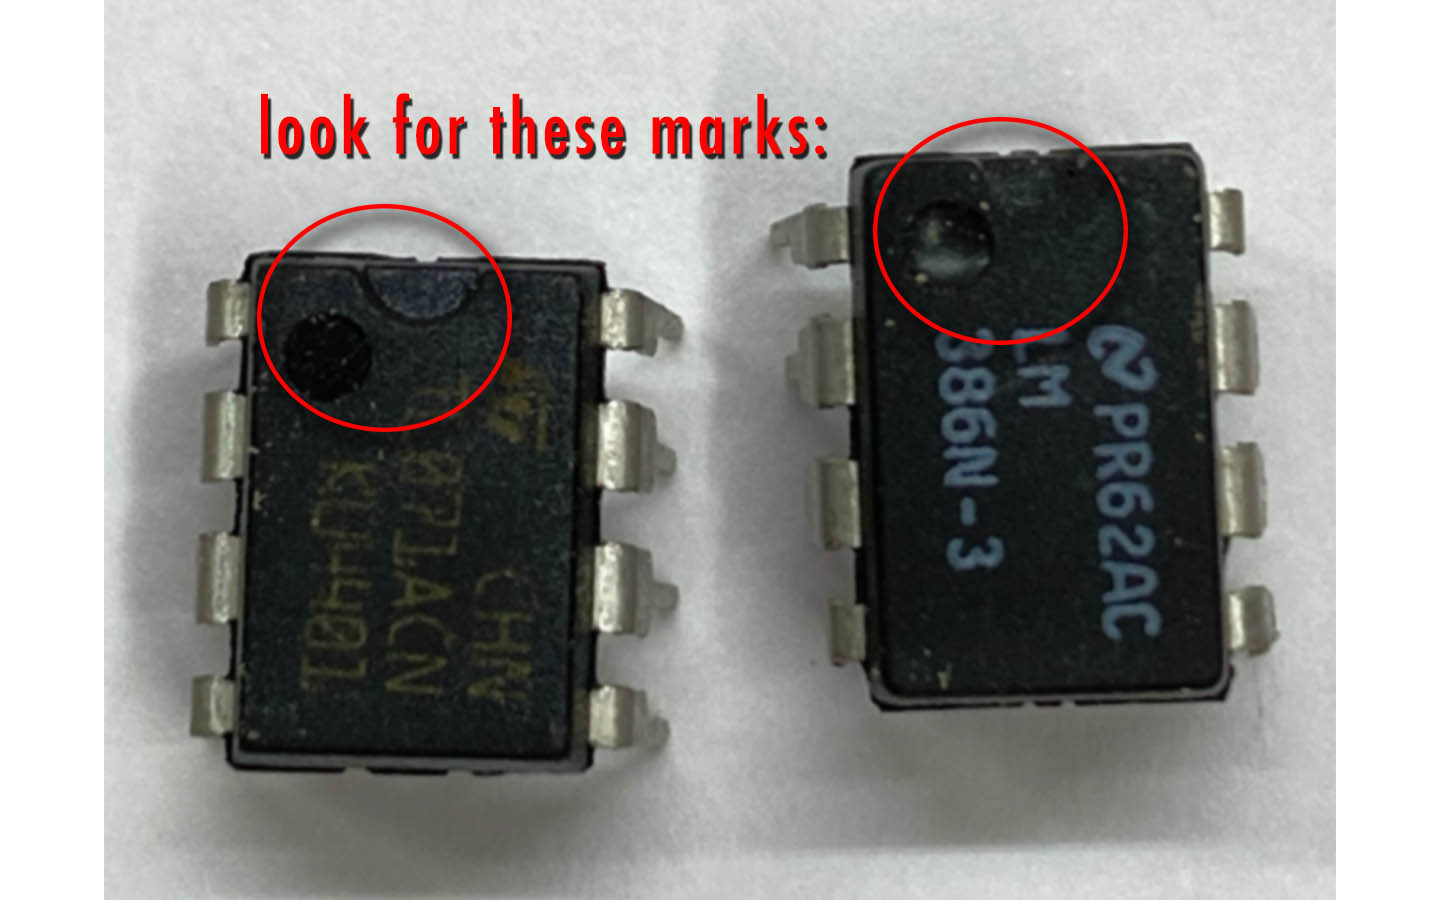
Whenever you work with ICs you need to be careful not to discharge static to the pins of the IC so it is recommended that you wear an appropriate wrist strap / ensure you are correctly grounded. Tinfoil hats are a must. Ok I made that bit up but please feel free to send me in pictures of your homemade tinfoil hats. Looking at the top of the circuit board you will see a small (isn’t it cute??) socketed chip. Admire it for a second. To insert a new IC remove this one gently using tweezers or a specialist tool noting the direction of the “dent” or circular marker in the top which shows you the chip’s orientation. You are now a pedal modder and have entered a new and brighter world…

Now we have heard people talk of various issues they have had when replacing the op amp with, oh i don’t know, say something like a Motorola 68000 out of their Atari St , the chip that controls their microwave, a 555 timer chip, a dead spider, something with more than 8 legs. Stop it. You will break your pedal if you do silly things with it.
Only single op amps will work. Some examples would be:
TL071
TL061
TL081
LM741
LM308
OP 07
TL070
TL080
NE5534
OPA134
LF351
Ca3130
For other alternatives this will require googling and looking at datasheets, or you can ask others at one of the DIY forum links below.
https://www.facebook.com/groups/6110761372/
https://www.facebook.com/groups/6110761372/
https://www.facebook.com/groups/190439971066228/
https://www.facebook.com/groups/556445917712892/
https://www.facebook.com/groups/39305970512/
https://www.facebook.com/groups/609239189157707/
https://www.facebook.com/groups/609239189157707/
https://www.facebook.com/groups/1066092703545364/
https://www.facebook.com/groups/324785372000161/
Websites:
https://www.freestompboxes.org/viewforum.php?f=73&sid=7989fbe108141e6d2991cfe9cb19353f
https://www.diystompboxes.com/smfforum/index.php?board=2.0
Once you have installed one of the op amps in the socket by gently inserting it , noting the direction of the little indicator, and being careful not to bend or worse snap one of the legs, you might want to quickly plug the pedal in and test it before putting it back together. Again I cannot stress enough that you must take appropriate safety precautions for working with exposed circuitry – we take no liability for your attempts to modify your pedals. You’re doing it at your risk and we won’t be held responsible if it sounds worse when you try either.
A final cautionary word on “real” LM308s. There are many, many fine listings (alright Commandant Lassard) of LM308s on popular auction websites. Not all of them are real LM308s. Some are simply re-badged Op Amps from the same family, some are complete fakes with a different Op Amp altogether. Hopefully this has given you some insight into how to break your pedal, something we don’t recommend except in the interests of science, or maybe in the interest of having a bit of fun 😉


Thank you for the guide and socketing the opamp! I just did this successfully with a LM308N chip today. A few things I noted:
* You’ll need 7mm, 10mm, and 14mm sockets for the Gain/Voice switches, Knobs, and Bypass switch. You can get by without a deep-well 7mm, but the others will need to have depth.
* When you reassemble, make sure to do so with the top of the PCB facing the top of the case (right side up), that’ll make it easier to get the internal lock washer on the Bypass switch to sit flat and not prevent you from getting the input/output jacks flush with the housing.
* The knob covers have Allen wrench/key screws, as mentioned in the article. I couldn’t find a matching Allen key (even though I swear I have 20 different sizes), but a type 0 Philips head screwdriver did the trick.
Only post-install trouble I had was with the knob covers. I don’t know if I didn’t tighten the Level and Distortion external washers enough, or if I didn’t seat the knob covers well enough, but neither pot twists as freely as it did before now (Filter knob is perfect). I’ll have to take the knobs back off and compare the pot shaft washer tightness to see why those two are misbehaving and the Filter one is fine.
Thanks again and what a fantastic pedal!
I’m far more interested in modding these pedals for remote bypass. I wish you kept that feature on the Bell.
Does the RatsBane have a buffer and charge pump in it as well?
True bypass, no charge pump
Curious, what does the TR1 do? Is it similar to Ruetz mod for one of the RC pairs of the opamp feedback loop reference?