First off, let’s talk Velcro. It’s used by most every guitarist under the sun to fasten their pedals to their pedalboards.
The original idea and design originated in 1948 from George de Mestral. He noticed that burs would keep sticking to his dog whenever it went outside to walk, and didn’t understand why. Upon looking at the burs closer, they were little hooks that would catch onto his dogs’ fur where it had intertwined. His theory was to use that same premise and make it useful in everyday situations, one major way was to attempt to replace the need for zippers on clothing. He created a hook side that was rigid and not very flexible, and the opposite loop side that was very flexible to allow them to bend and mold to fit as many hooks to the loops that they could, creating a more secure hold. The trick was finding the right combination that would be secure, yet easy to remove when pulled with enough force. Fast-forward 67 years and we’re using it for all sorts of stuff now.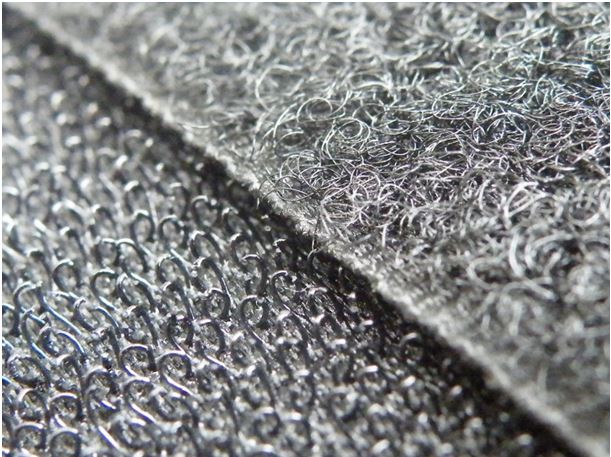
I’m discussing this because of the concern that’s often brought up about not being able to secure pedals to the board with stability (especially with mini pedals). Standard run-of-the-mill Velcro works, but it’s not fail-proof and is prone to unlooping and the pedal falling off under heavy use. The technology has changed considerably in recent years, and it’s improved the staying power of that hook and loop mechanism, as well as the adhesive that is used to hold the strip to the material.
Similar Velcro Alternatives
3M Dual Lock is one option that a lot of guitarists use. Instead of the traditional hook and loop method, Dual Lock uses a mushroom shape that sticks to itself to create a tighter, more secure fit. The adhesive has been improved over the years to make it excessively adherent to smooth surfaces. It comes in a roll, and all that’s needed is a pair of scissors to cut the pieces as large or as small as you want. The surface you’d be applying it to needs to be clean and smooth to obtain the best adherence. This guy does a pretty good job explaining it:
The particular brand that I use is Godlyke Power-Grip pedalboard tape. This brand uses a similar mechanism to the Dual Lock and also comes in a roll. Having two rigid sides makes it more difficult to apply to itself, but once it’s on there, it’s ON THERE. The adhesive is quite powerful, so much so that as long as it’s on a smooth clean surface, removing it is quite difficult, and if not done correctly and with patience, it will take finish off of the pedal. Again, all that’s needed is a pair of scissors and the surfaces to be clean and smooth. Here’s the video from the company that shows application and all that:
The thing that I suggest the most personally is not to run the hook and loop strips along the center of the pedal. This will make the pedal much more unstable and prone to rocking. With the above mentioned alternatives, an inch or so on the top and the bottom of the baseplate of the pedal will secure them without any rocking or instability. Another bonus of these two options is the ease of theft on pedals is reduced. Once the pedals are secure, if it isn’t peeled off the right way from the board, it will lift the board off of the floor before it will come off. I’ve personally lifted my pedalboard just holding onto a mini pedal with this particular brand.
**There are other alternatives out there, but these are two that I’ve dealt with personally
Alternatives to Hook and Loop Fasteners
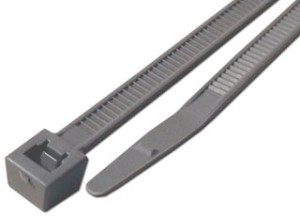
Another method is using zip-ties (also called cable-ties) to secure the pedal to the board. This doesn’t require nearly the amount of tools as the bike chain method below, but it’s a bit more routing than just slapping a strip on there. What’s needed is a pair of scissors, a bag of zip-ties, and holes to run the ties through. This works really well because the pedal can be put on as securely as you want it to with reduced rocking or wobbling. To swap a pedal out, just snip the tie and swap the pedal and tie down the new one. One concern is making sure that the connection is secure without rubbing off the paint from the pedal. This method may be difficult for some boards, but there are also brands that are dedicated to making boards with holes designed to be used with zip-ties. In terms of theft, the person would have to be able to cut the zip-ties to remove the pedal, which will take a little more time.
The last method is by far my least favorite of the ones mentioned, but it seems to work well for a lot of people (I’m a habitual pedal swapper). It involves using bike chain links to fasten the pedal to the board. This method has a lot more involved with setup, requiring the bike chain links, a drill, screwdriver, screws, and the installation on the pedal. The downside of this method is that swapping pedals is not quick and easy. It requires a screwdriver on hand to unscrew the pedal, all of the pedals need the chain links, and if it’s a different size pedal then new holes will have to be drilled. If you keep the same pedals on consistently, then it would be an excellent option. For the frequent swappers, it’s some added time and trouble that may be unwarranted. This method helps a lot in terms of preventing theft too. I will provide a link below to the instructions for those interested.
The key thing to remember is that different methods will work for different people. This is just a glimpse at a few different options that are available to make your life a little easier hopefully. Until next time Tone Chasers 🙂
**Bike chain picture and instructions on bike chain method can be found here: http://xmidi.com/bicycle-chain-links-as-velcro-alternative-for-guitar-pedal-board/


I drilled holes in my Pedaltrain aluminum for zip ties.
Did it work good?
Instead of bike chain links I use plumbing strapping and just break it off two holes at a time. It’s cheap and works well. There are a couple of issues I have had. One is where the pedal screws are too short to screw in with the strapping attached. The other is pedal designs where the screws are in places that don’t work. In those cases I use a section of strapping with heat shrink on it and run the strap over the pedal.
I’ve yet to put together my first pedalboard; but anyway at work we had a way to open cable ties without cutting them. It was fiddly and you kind of pushed some fine tweezers in the back of where a cable tie joined. These were quite fine tweezers used in electron microscopy (back when I was still doing a little of that for my job); but a small screwdriver would probably be suitable instead.
I’ve used the zip tie approach for years and honestly I’m not a fan. It works well in the beginning. But the plastic naturally stretches a bit and the pedals shift left and right, making everything look really messy. There’s no perfect solution, they each have pros and cons.
I hate hate hate working with glue or any material that attracts debris!! Screw down is the only way to go for me. Zip ties, though fine for containing cabelry, are also no solution. Someone please, bring something to the table. It’s a shame that all known pedals cannot have a 3D replacement backplate. I am simply not going apply anything to my gear that removes paint! So, it’s still chain links for me until longer screws and widely available plate replacements exist.