When I first started with Wampler, all those years ago, the conversion about Midi was often happening… if I am being completely honest, we didn’t have the need for it because our corner of the market wasn’t really there yet – but as we’ve got bigger and far more in depth with all the technical ‘stuff’, it’s got to the point now where we feel it’s madness not to go down that route. This makes me really happy as I’ve been using midi controllable rigs on and off since the 90’s so for us to be going down this path it’s one that excites me massively!
Over the years we’ve gently asked our customer base about incorporating midi into our products and the one thing that always comes up from many people is either “wut?” or “I don’t understand Midi”… so, with the Terraform about to be released, I thought I would give an introduction, written in a way I understand and use it, to help you if you are in anyway confused about what it can do for you.
Midi is an acronym for “musical instrument digital interface”. What it does, fundamentally, (we won’t even go near Midi v2 that has recently been announced), is send control information digitally between various pieces of equipment. The best way to explain this is in terms of a keyboard. If you separate a regular keyboard into it’s most basic elements will have two parts. The keyboard (user interface) and the sound module (the thing that produces the sound). The keyboard receives a command from you – usually “this key has been pressed and it’s been pressed this hard” and it fires off that information to the sound module via a midi signal. The module receives that information and then activates “that note, this hard” and you hear it from the speakers.
Midi is basically run on a numbers system from 0-127 and those numbers are what is transmitted. So, if key 40 is pressed at a velocity of 127 on a full size midi keyboard, you are going to get a middle C blast out at the highest velocity you can get. What gets really interesting is when the nerds start to sample instruments at 128 differing levels of being struck, which is where touch sensitivity comes into it. If it has 128 different samples of the instrument being struck at 128 ever increasing velocities… no touch sensitivity (heeelllloooo 1982) would be present and the note is either “on” or “off”. Touch sensitive transmits the velocity as well as the location… Hopefully, you are still with me!
What does this mean for guitar players? Well… firstly, I’m not going to go down the route of midi guitars here (although I truly feel that within a few years they will be FAR more common because technology is finally catching up to the concept from where it started in the 80’s, and it’s still my ultimate goal to have a completely midi guitar rig one day that acts and feels like my favourite guitar, but sounds like anything I can think of from a Strat, Les Paul, Telecaster, Nylon Strung etc etc), but more about how it can control multiple pieces of equipment simultaneously with patch changes, making your life a LOT easier.
We can start off by looking at my old rig (as I love any opportunity to talk about my gear, past and present). If you’ve been reading this blog for a while, you’ll be aware of it I expect, but in case you haven’t, here it is in a nutshell (effects section)… Signal chain:
One Control OC10 Looper, containing:
- Strymon Mobius, pre gain;
- Wampler Mini Ego;
- Wampler Tumnus;
- Wampler PaisleyDog – c2;
- Wampler PaisleyDog – c1;
- TC Electronics Quintessence;
- Strymon Mobius, post gain;
- Strymon TimeLine
- TC Mini HOF; and
- Wampler dB+.
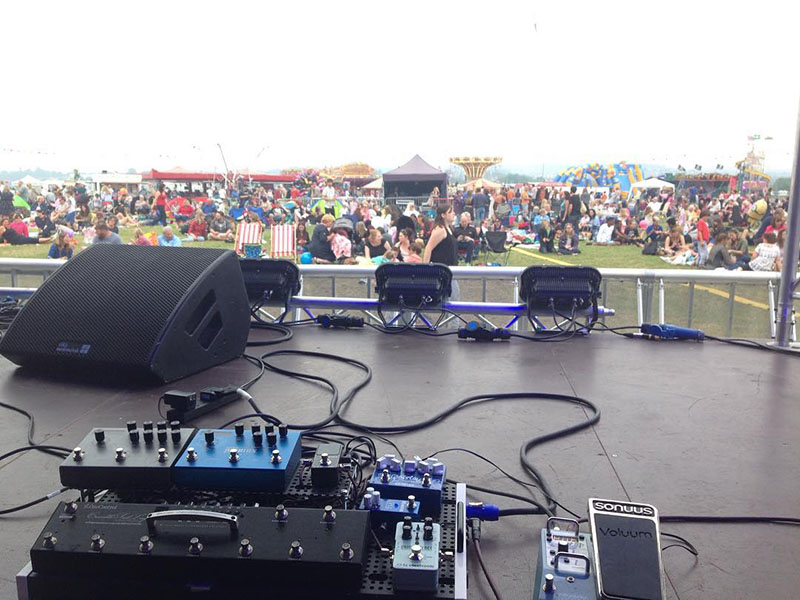
Obviously, I had the pedals set and used the looper to bring in each when I wanted them (usually multiple pedals being brought in and out with the touch of one stomp). It was a massively versatile rig with those three gain stages and I could literally pull out any sound at any time and it would always sound amazing (humblebrag). When you add in the additional control I had via midi using the two Strymons, it very quickly got to the point where I was using upwards of 60 or so patches across 8 banks on a two hour gig. Obviously, you don’t need to do that, you can just use however many you like, but when the options of differing modulations and delays instantly available you can get waaaay deep, really easily. And I can tell you now, it’s a LOT of fun.
What has midi got to do with this? Well, the OC-10 is a midi controller looper and both the Strymon’s receive midi commands. Here is how it was used. Before we go any further, I need to point out a little annoyance I have with some of the more complex pedals, and how they are not midi mappable…. Alright, OK, I’ve gone there, so here is what midi mappable is all about and what is unfavourable with some systems who don’t have it.
When you get into loopers, you create banks of sounds according to the band you are playing in and the songs you play. For example, my board was set up with Bank 1 (8 presets in a bank) for “general” which had a mixture of clean, dirt and dirty solo sounds in it, as that is what I used most of the night. Bank 2 was my “clean” bank, so that was clean stuff, slap back delays, vibes etc… Bank 3 was where I started to get into specific songs that needed specific sounds, so it was a real hotchpotch of tones including various sounds that had flangers, chorus’. Vibes etc etc. I know… get to the point, Jason… but this is exactly where I am going. When I was creating these tones, and because the units I was using were not midi mappable, here is how the pedals saved the patch information coming to them… My first modulation sound on my board was bank 2, patch 3 (clean vibe sound). My second was bank 3, patch 4 (dirty vibe sound). Then was Bank 4, patch 1 (clean big chorus), Bank 4, patch 8 (dirty solo sound with the same big chorus across it) – it was like this all the way up to bank 8. As the units were not mappable, that means that my first Mobius preset was saved on patch 23 (bank 2, patch 3 on the OC-10), my second was patch 34 (bank 3, patch 4 on the OC-10), the next one was patch 41 (Bank 4, patch 1 on the OC-10) and so on. So, if I was playing around with the Mobius away from my rig I would get 22 blank user patches, then one of mine, then nothing to patch 34 and so on… It becomes really bloody annoying when you are messing around with the unit on its own.
When this became even more annoying was when you get into the delays… I like to use a LOT of delay, and I don’t mean have it overbearingly loud, but it is on everything. A small amount of delay just gives me a lovely element of width. As most of the tones within my board were splittable into two sections “basic rhythm” or “ basic lead” (obviously, there were ones outside this), I would say I had about 30 individual patches set up that were EXACTLY the same within the TimeLine. That being a basic rhythm delay setting. On top of that about I had almost the same amount of the same patch duplicated over for solos… All because the units were not mappable and they created a new patch location every time I used a new preset on the looper.
Here is the point (…to loud cheers from the readers…) If they were mappable ALL of my rhythm patches for rhythm would have pointed to ONE patch only on the TimeLine instead of creating 30 or so duplicates. So, across the first bank of my controller that had 5 rhythm patches (clean, clean loud, dirty, dirtier and filthy) all using the same delay, 5 different patches were saved on the TimeLine. If they were mappable, all 5 patches on the looper could have pointed to the ONE patch on the pedal. As you can imagine, when you want to tweak ALL of your rhythm delay lines a fraction for any reason, having to change 30 patches is a pain in the arse. It’s much better if you only have to change one…
This is why you are seeing a LOT of new midi controllable pedals come out that appear to have a lot fewer preset locations on them, because – quite frankly, the VAST majority of people just don’t need 128 or 256 locations as most of them will be duplicates (note that numbers, 128 and 256… because midi sends numbers between 0-127). Once you get into providing 128 patch locations you start to get into the realms of needing display screens on the pedal, you start to get into banks and banks of duplicate patches, which can be solved with basic midi mapping.
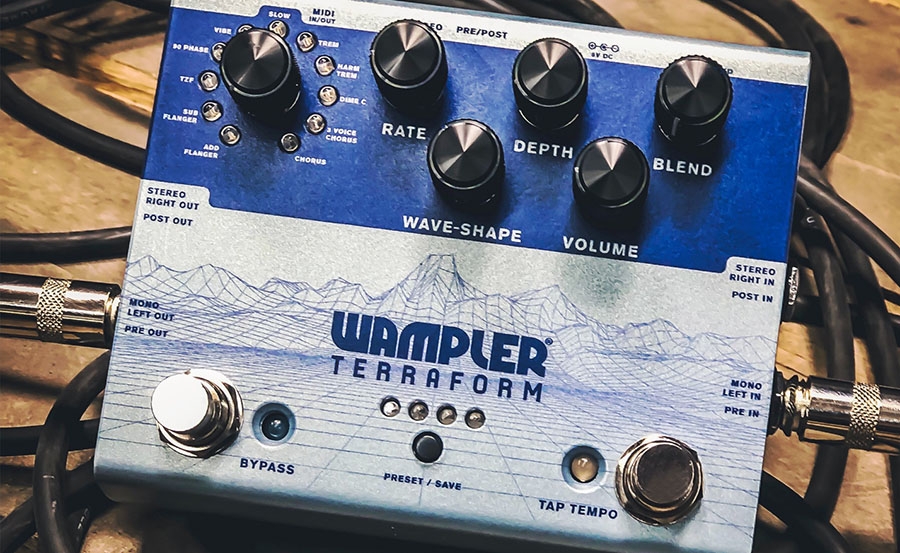
Obviously, as the Terraform has 8 saveable preset locations, we have jumped straight in with midi mapping. The terraform will recognise 128 different commands coming into it (presets commands from your looper), and then allocate the desired patch from the 8 saved to that command. So, Bank 1, preset 5 (on the lopper), Bank 1, preset 6 (on the looper) and Bank 3, preset 2 (on the looper) etc etc will all be able to point to a single patch within the Terraform. We have worked extremely hard to make how this is handled on the Terraform as easy as possible – so much so that when I explained how we are doing it to a good friend of mine who is of the attitude “I don’t get midi, it’s so confusing” he understood it instantly and said “Yeah, I get that, it’s easy”. So, all those who are considering going down the midi controllable looper route, we’ve made this extremely easy for you.
The midi in and out/thru (thru is essential as you can run multiple units in a chain that all receive the same command from the controller, making it so you can change multiple units from the press of one button) are right there on the back and are in the format of a TRS mini jacks (WHAT???!!!??, I thought they were 5 pin plugs??)… it has ALWAYS baffled me why most units have a 5 pin midi plug on them, as the cable itself only uses two of the pins – 2 and 4 with 1, 3 and 5 not connected at all (there is probably a historic reason for this, but I am unaware of it). So, as the industry moves forward with the mini TRS cable, so have we… those 5 pin ones are huge and effectively a complete waste of space and as one of the major concepts of design with the Terraform was pedalboard real estate, we are not wasting a single millimetre on oversized, unnecessary plugs.
There you have it, a VERY basic guide to midi for guitar pedals, midi mapping, and players like me. If you have any questions about this, feel free to hit me up on social media, I’m pretty easy to find, especially in our Tone Group on Facebook!


Actually, the problem was your midi controller, not the pedals. If you used a Musicomlab, for example, you can call up any patch in the strymon.
Hi Jason / Brian, I love the terraform and the sounds, but I may have to ditch it and go to a möbius just because you decided not to support midi clock.
In the manual you sort of say “don’t worry this midi bit will be short, as many guitarists don’t get midi”, but many guitarists do! And in this day and age they expect the basics – sync, midi mappable controls – to be present in any pedal which supports midi.
I really don’t understand why you made this decision as; 1) it’s not a huge processing overhead and, 2) these features would be transparent to propel who want to ignore them.
Please, please try to fix in an update? Otherwise you are seriously handicapping a great pedal…
(NB also you may want more than eight presets so that you at least have one per algorithm!)
Thanks ????
Jon
Thanks for the explanation. I think, MIDI mapping is really useful. However, I also support the idea of Jonathan N in the comments to have more than 8 presets so we could access all 11 algorithms via MIDI.
It would be even possible to display 11 individual presets via the inbuilt 4 LEDs as follows (“o” indicates LED ON; “-” indicates LED OFF):
1: o—
2: -o–
3: –o-
4: —o
5: -ooo
6: o-oo
7: oo-o
8: ooo-
9: o–o
10: -oo-
11: oooo
(12: —-)
MIDI Clock can be synced with CC 81. Maybe that’s an update since the original comment?
However, I do wish there were more than 8 presets. Not only to have one for each algorithm, but I like to have multiple sounds within the same algorithm available the lazy way with a footswitch (without having to reach down each time to turn a knob, although yes this works too).
Correct, we have updated it – we should probably update this blog (I will add it to my list) the very latest Terraform board support 128 presets via Midi, expanded CC commands, and Midi Clock – to discover if you have the latest version check the instructions here: https://www.wamplerpedals.com/wp-content/uploads/2023/10/TerraformAddendum_1023_3.pdf
Hi, I’ve got a terraform connected as the penultimate pedal in my midi chain (free the tone AS-1R come after it) When there is nothing plugged into midi thru, the terraform works normally and accepts midi commands, when I plug into the midi through, the AR-1R works fine but the terraform stops making the midi changes. I’m scratching my head to work out why?! Does anyone have any ideas please?
Are you using separate midi channels for each device?